Thursday, 19 August 2010

Its been a long time!!!

Hi my dear friends. So sorry I haven't been around much lately as I was away for while.

So, I'll first post the Communion cakes that I did in June.


And this is my son's Communion cake.


Saturday, 22 May 2010

Cupcakes & B'day Cakes!!

Here are the cakes that I did for this week. I made these cupcakes for a good friend. These were for her husband.


This is a design that I have done before.


This was for an 8 year old boy, who loves his Beast Quest books.


Friday, 14 May 2010

More Cakes from Last few weeks!!!!

Hi Everyone, sorry haven't updated my blog for a while. Hope you all doing fine!!!! Here are the cakes I did last few weeks.

THE GHOST CAKE.

I made this for a little girl who had a Monster Mash party. Actualy it was a cupcake tower that I did with the ghost cake on the top. One thing I forgot to take with me to the venue was my camera. So I don't have the whole setup to show you all!!!!!!


This next was a ver very quicky!!!!! Never did a cake that fast in my life!!!!!!! It was a very simple design too!


PINK WEDDING CAKE.

Here is a wedding cake that I did at the begining of this month . They wanted Fuchsia colour and I am really pleased with the end result. Hope you like it too!!


Here is a closeup of the flower sprays.


Saturday, 27 March 2010

Shoe and Handbag Cake!

This was a fun cake to do. But I wasn't sure about making the handbag at the beginning. But at the end I made it with pastillage.


Here is how I made the handbag!

First I made a template like on the picture below. This is my first ever template I did by myself. I wasn't sure whether its going to work or not.


Then I rolled the pastillage to 1/4" thickness and cut the shapes out. You need two each from the shapes no.1 and 2. I put them on a board and left it in the airing cupboard to dry. Here is a photo of the dried cutouts.


Put them together with royal icing. If there is any space between them, fill them with royal icing, and leave it to dry. Once its completely dry, measure the top of the bag and cut a piece of pastillage according that measurements. Let it dry and again attach it with some royal icing.

Then either using sugarpaste or flowerpaste cut the shapes out using the templates and glue them with sugarglue. Make sure you start sticking it from the top and work it down to release any airbubbles. Here is a photo to see.


Then I use the Jem strip cutter to make the handle. Once I've cut the strip, I shpaed it to look like the handle and left it to dry. When its dried, covered it with sugarapaste and left it to dry again.


Then I used FMM shield cutter to make flap of the bad. But you can use anything you fancy. Glue it to the top with a little bit of sugarglue. Once you have done that, you can attach the handle with sugarglue or royal icing. Then I covered the edges by using strips of sugarpaste. But you can use your sugar/clay gun do that.


And here is the end product & hope you like it.


Wednesday, 3 March 2010

Number 1 and a Hobby cake!

This Hobby cake was a joy to make! I really loved making it. It was for a Gent's 90th b'day. His hoobies were Pheasent shooting, Golf, Tennis, Snooker, Bridge and he also had golden labradors. So I had to incorporate all these to a one cake.


Hope you all like it!

I also made a little step by step on how I made the Tennis rackets.

First you need to roll out some white modeling paste to a thin sausage. You also can use your sugarshaper/clay gun to do this.


Then take the two ends and make the frame of the tennis racket like in the below photo. When you have got the correct size you want and if there is any excess, cut it off.


Roll out some more modeling paste to thin sausage shape ( thinner than what you used for the frame) and attach horizontal lines from one side to the other like in the photo. Use sugarglue to attach them.


And do the same verticaly. Then turn it over so it can settle and dry nicely.


Here is the finished rackets. I cover the handles with coloured modeling paste.


Here is the Number 1 cake I made. Winnie the Pooh is shop bought model.

Sunday, 14 February 2010

Gym girl cake!

Here is the cake that I made this week.


One of my cousin's who does cakes asked me how I do the figures. So this is for her!!!

First I have to say a big thank you to Lorrain Mckay for her tutorials where I learnt how to make people!!!!!!!


These are the modeling paste colours that I have used. Brown for trousers, White for the top, the flesh colour for the body parts and the black for the eyes. I made the flesh colour paste by adding a tiny bit of Paprika/Flesh paste colour from Sugarflair.


Here are the tools that I have used. Edible glue, black paste colour, paint brush, scissor, small knife, no.2 piping nozzle, toothpick, small rolling pin, ball tool, tiny palette knife, leaf shaper and comb and scallop tool.


First take the brown modeling paste and roll it to a ball and then into a sausage shape with one end wider than the other side. Then using your hand flatten it a bit. Then cut it in half, just above half lengthwise.


Then push the top part upright to look like its seated. Maybe this photo will help you to understand how it was done.Then use the thin side of the leaf shaper to give it bended knee look.


Next, take a ball of flesh coloured paste roll it to a tear drop shape. Then pinch the pointed side to make the neck. I got the shape of the upper body by using my fingers. Here is how it looks like when its done. Make sure you cut the pointy bit from the neck. Just a little bit!!!


Then glue the upper body to the trouser by using some edible glue. Once you have done that, insert a dry speghetti through the neck to the trouser. But not all the way down!! At this point, I let it dry overnight.


To make the sleaveless top, I roll out some white paste and cut a rectangle. Then folded it in half and pushed it through the neck. Make sure that both sides are same length and it covers the body!


Then cut the sides and rub your fingure on the seam to make it neater.


Then to make the arms, take another small ball of flesh colour paste, roll it out to a thin sausage. Then using your index fingure, flatten one end to make the hand. Then take the knife and make 4 cuts to make the fingers. Then using the wider side of the leaf shaper push on to the tip of the fingers to make finger nails. Then using glue, stick to the side of the body.


For the face, take another ball of flesh colour paste. I always insert the ball through the speghetti to make sure its the right size. Then using the small side of the ball tool, mark the eyes. Then using the toothpick, mark where the nose should go. Then using the scallop tool, mark the mouth. Then take another tiny ball of flesh colour paste and stick it where the nose was marked, with some glue. Then with the toothpick mark the nostrils. Take a small peice of white paste, roll it out and using the piping nozzle, cut two small circles. Then keep it on the board and press it with one side of the rolling pin, to make it flat. Put some glue on where you marked the eyes and stick the two white circles. Then do the same using black paste but don't flatten it. Take that and glue them on top of the white circles.


Then mix some black paste with clear alcohol, paint the eyebrows and eyelashes. Once you glue the face to the neck, mark where the ears should be with a tooth pick. Take two tiny balls of flesh colour paste and flattern them a bit and glue them to look like ears where you have marked. For her shoes, I rolled out two teardrop shaped balls and glued then to the end of the trouser legs.You need to let it dry again overnight before you add the hair.
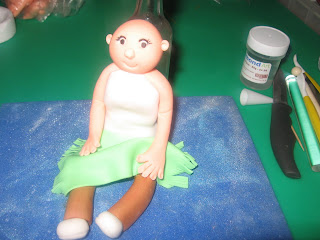


And here is the end product! I used brown coloured royal icing to pipe the hair.


Hope you like it and thank you!